We rely on Siri as the voice interface in our smart home. This has advantages, but also disadvantages and limitations. For example, I was not able to control Volumio via HomeKit or to adjust the volume or change the radio station. But now I have done it with the help of Node-Red! Now I am able to start both Volumio with my favorite radio station, adjust the volume and change the station. How my procedure was, you will learn in the article so read on!
Many roads lead to Rome, so I have tried another way to control Volumio before. About the HomeKit shortcuts, but that was always very complex, and I did not get along with it. Then I came across Node-Red and the joy was great when I discovered that the installation was possible in parallel with my Homebridge on a Raspberry Pi. For the setup these ingredients are needed:
- Homebridge installation best on a Raspberry Pi*
- Installed Node-Red
- A Volumio Player preferably on a Raspberry Pi
- Volumio Nodes for Node-Red
- HomeKit Nodes for Node-Red
- Of course a HomeKit, in my case with an Apple TV* as base
Admittedly, a Homebridge is not mandatory. But I installed Node-Red next to my Homebridge on the same Raspberry Pi*, using the original Homebridge image. That’s why I’m explaining my approach with Homebridge.
Homebridge and Node-Red
You can learn how to easily set up a Homebridge in my earlier article “Installing Homebridge on Raspberry Pi and that easy!”. Everything is based on the Homebridge image used in the article. When installing Homebridge and Node-Red manually, there are some pitfalls, but why make it harder than it has to be? How you then install Node-Red, you will learn in my article:
“Install Node-Red in parallel with Homebridge”.
Volumio for Raspberry Pi
You can get the Volumio image from Volumio.org and here is the direct link to the Volumio download page. On the download page there is also a quick installation guide for Volumio. For flashing the Volumio image the software “Etcher” is used, the same as for flashing the Homebridge. If you are not sure, please have a look at the above-mentioned Homebridge article.
Volumio Nodes for Node-Red
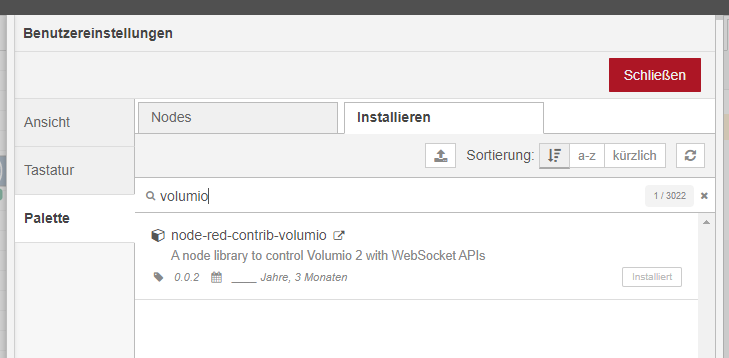
The base is now ready, but a few ingredients are still missing. You need to add some “nodes” to Node-Red so that it can communicate with Volumio. To do this, go to the three stacked strokes in the upper right and select “Manage palette” and choose the “Install” tab. In the search field you enter Volumio, then the correct nodes should be displayed. For me, it already says “Installed”, for you, it should say “Install”. Click on this button and install the nodes.
The sidebar should now contain the new nodes under “Input”.
HomeKit device node for virtual switches
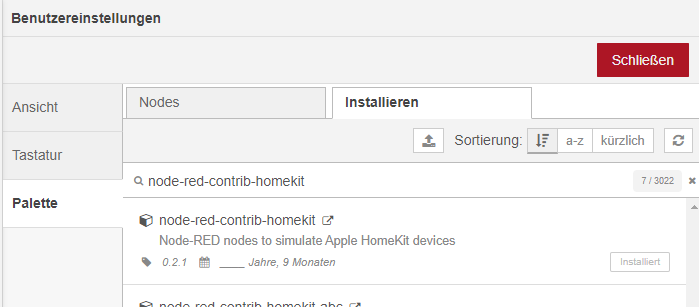
To add our own virtual switches to HomeKit via Node-Red, we need another node. I have installed the “node-red-contrib-homekit“. You install this node just like the Volumio nodes before. It is only one node but relatively powerful, because with it quite a lot of devices can be created virtually in HomeKit.
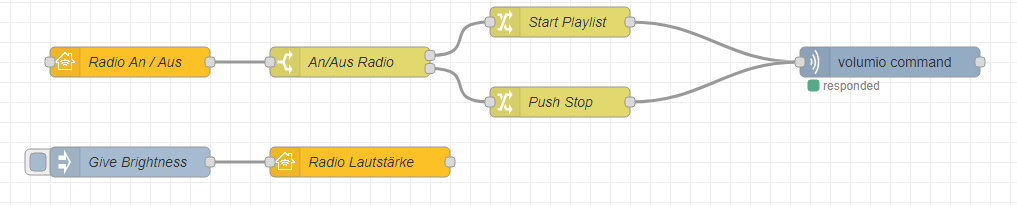
Start Volumio with favorite radio station
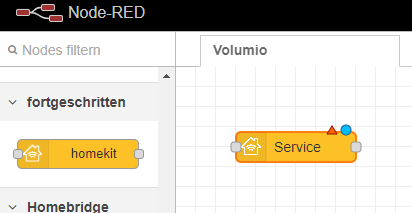
First, I wanted my Volumio in the kitchen to start playing my favorite radio station when a virtual switch is pressed. To start with, we create a switch and drag the node into the flow.
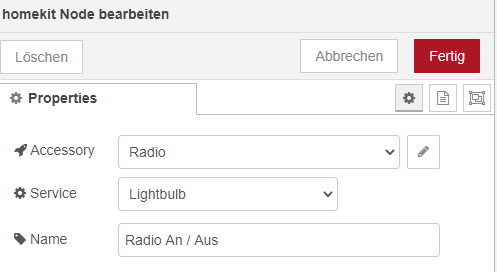
We still have to configure this node, but don’t worry, most of the settings will be left at default. Now we first double-click on the node to open the settings. Then click on the little pencil to create a new “Accessory” or device.

The properties of the device will open. Here you only need to specify the device type and name. I chose the type “Lightbulb”, this is a simple device, you can switch it on and dim it, that’s enough for now. I have named the device “Radio”.
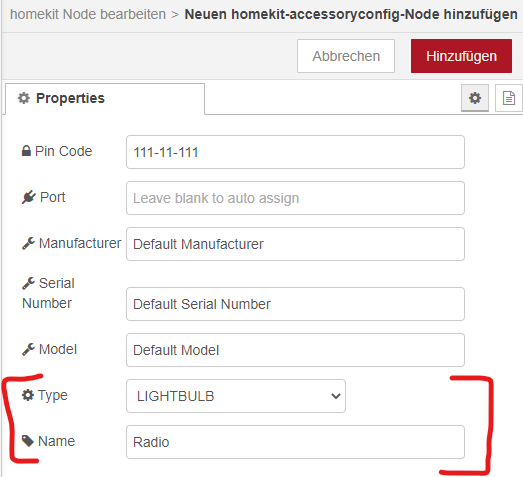
After clicking on Add, you are back at the properties. There I also set “Lightbulb” as “Service” and gave it a name.
Deploy the first virtual Switch
That was it! Now publish the flow with “Deploy” and you can add the virtual button in HomeKit. To do this, go to the Home app on your iPhone and then click on Add Device. Since you don’t have a QR code, click on “I don’t have a code or can’t scan”. When adding, you will need to enter the pin code that is given in the properties. A tip on the side, you should only publish the changed nodes, otherwise every switch that is already registered in HomeKit will also be updated again. This may take a little longer and also has undesirable effects on the switches, which I will discuss later.
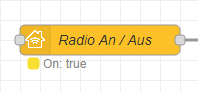
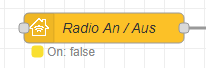
After adding the switch in the Home app, you can activate it directly and the switching state will be displayed in Node-Red. The text “On: true” is then briefly displayed under the HomeKit node for the switching state “On” or “On: false” for the switching state “Off”.
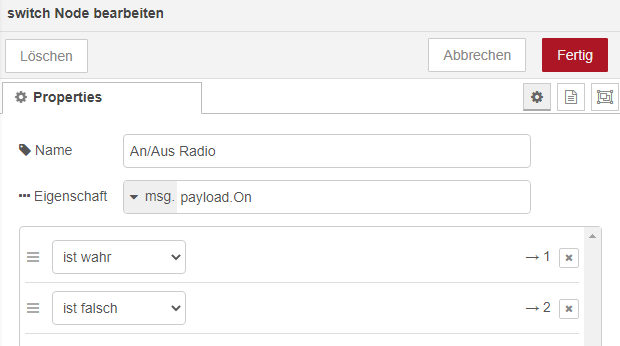
The switch-node for evaluation
I have evaluated these two switching states with a “Switch” node. In this evaluation switch node we give two queries. With “On: true”, so if the object “On” is true, it should be forwarded to output 1 and with “On: false”, if the object “On” is false, it should be forwarded to output 2. The evaluation switch node can be found at the category “Functions”. Simply drag this node onto the grid and connect the output of the Volumio switch with the input of the evaluation switch node. After a double click on the evaluation switch node you edit the properties as shown in the picture. It is important that “On” is written the same way, with a capital “O”, otherwise it won’t work. You have to pay attention to the upper and lower case!
In the end, your flow should look like this:

Convert the output in Volumio Commands
Now the information at the outputs must be converted into commands that Volumio can understand. For this I have inserted two “Change” nodes, one for each output of the evaluation switch and connected the evaluation switch outputs with the inputs of the new change nodes.
I want to start a playlist in Volumio that contains my favorite radio stations. These stations are in a playlist with the name “Radio”, because I want to change the stations later with a button and that works easier in a playlist. But now to the setting of the Change-Nodes. The Change-Node at output 1 of the Switch-Node is double-clicked and set as follows:
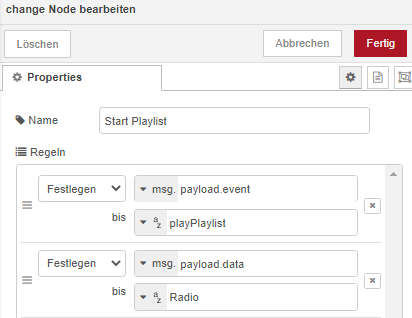
The first object that is passed to Volumio is called “event” and contains the Volumio command “playPlaylist”. Now Volumio needs the name of the playlist to start, this is supplied in the object “data”, and my playlist is called “Radio”.
The second change-node is to stop the playback, this must be set as follows:
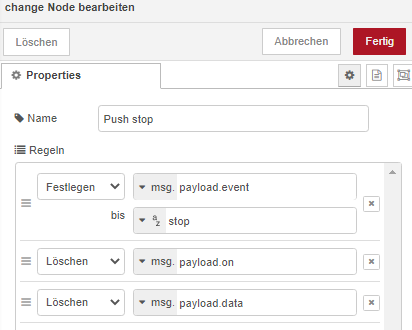
The Volumio command “Stop” is now passed in the event object, this requires no further data. For this to work properly I had to delete everything unnecessary from the Payload object in this case. Now comes the moment when we insert the Volumio Command Node! After inserting and connecting our flow should look like this:

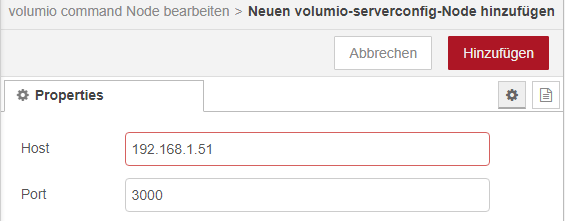
In the Volumio Node the IP address of the Volumio device must be stored. So double-click on the Volumio Command Node and then click on the small pencil next to the text “Add new Volumio server…”.

Enter the IP address of your Volumio as host. After that click on “Add” and then on “Done”. That’s it! If a playlist named “Radio” exists in your Volumio, you can now start and stop it with the switch in HomeKit.
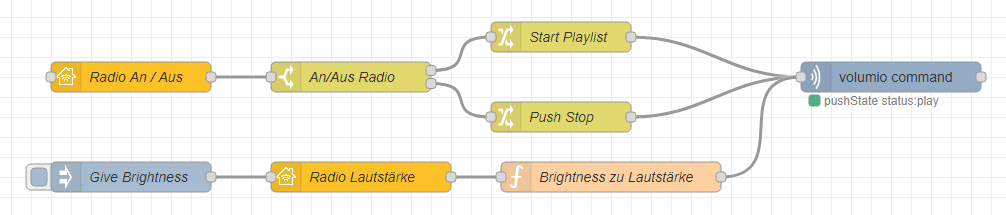
Volumio volume control via HomeKit
Starting and stopping the music is already quite nice, but I also wanted to adjust the volume of the Volumio via HomeKit. I did this with the same switch as for turning on and off. So you select the switch “Radio On / Off” and copy it with the key combination “StRG” and “c” and paste it again with “StRG” and “v”. After that you change the name of the switch to “Radio Volume” and publish the node.
If you now tap on your switch in HomeKit, then a view with two switches opens and one of them has the name “Radio Volume”. But now I wanted to adjust the volume steplessly, like dimming a lamp. So the switch has to be converted. For this we have to set the “Brightness” for the switch once. To do this, add the node “inject” from the category “common” and connect the output to the input of the volume switch. You configure this “inject” node as follows:
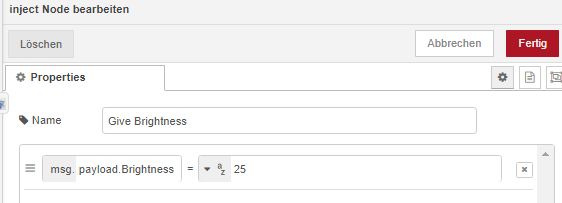
The numeric value should be greater than zero and is the volume. Pay attention to the upper and lower case when filling out the payload! After you clicked finish your flow should look like this:
Inject Brightness and make sliders
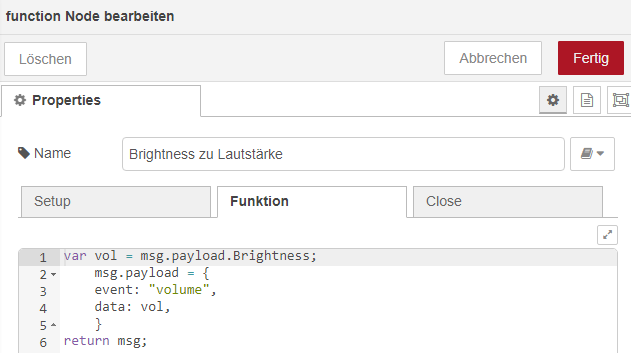
If you now click on the small square on the left side of the node “Give Brightness”, the Inject Node transfers a value to the switch “Radio Volume” and your switch in HomeKit becomes a slider. If you move the slider in HomeKit, you will see the set value under the switch in Node-Red. This value now needs to be converted into a volume command and sent to “Volumio Command”. To convert the payload this time we use a function node. We write the following function into it:
var vol = msg.payload.Brightness;
    msg.payload = {
    event: "volume",
    data: vol,
    }
return msg;
After editing the node, you create the connection to the “Volumio Command” node, and you can change the volume via HomeKit. The flow now looks like this:
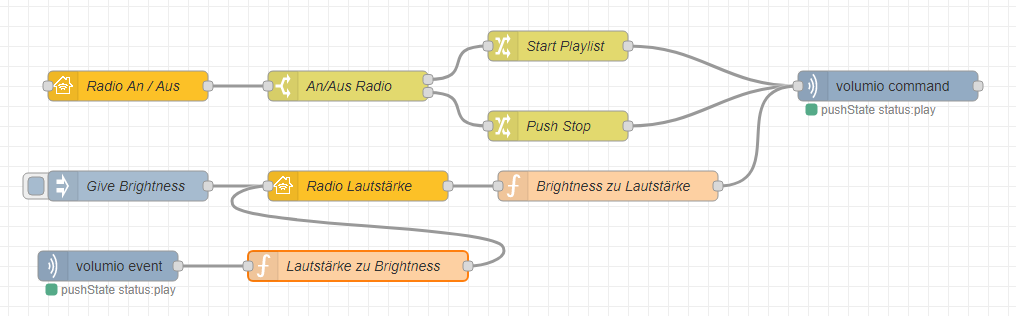
Synchronize Volumio Web and the slider
Now it can happen that you change the volume via the web interface of Volumio, this no longer matches the display on the HomeKit switch. To fix this possible error, we add the “Volumio event” node. In this node, we select our already created Volumio server and click “Done”. Then we add a function node again. In this function node, the volume of Volumio must be converted into a “Brightness”. To do this, insert the following function:
var vol = msg.payload.volume;
    msg.payload = {
    Brightness: vol,
    }
return msg;
The flow grows and grows:
If you now change the volume in the Volumio web interface, the volume switch in HomeKit will also change, as if by magic. But remember, if you always publish your whole flow then the sliders will become normal switches again! So only publish the changed nodes, otherwise you have to convert the switches manually with the Inject Node back into sliders.
Select the next track in the playlist
The only thing missing now is that the next radio station or track in the playlist can be selected via HomeKit. For this we add a completely new switch, do not copy! In this new switch, a new “Accessory” is created, as previously described for the “On / Off” switch only that the name of the “Accessory” and the switch is “Next”. More, does not need to be set now. After the “Deploy” the switch can be added to the HomeKit. Our new switch should reset itself automatically, so we add a change-node that sets the payload from “On:true” to “false”.
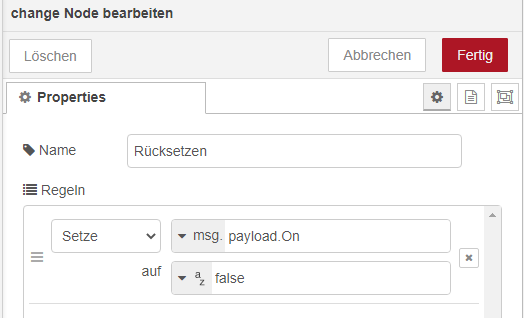
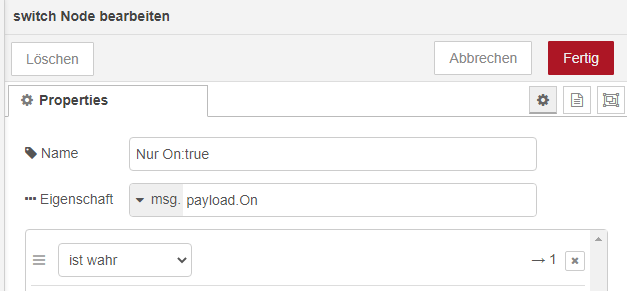
The new “Next” switch should also play the next title only if it is switched on. For this, the “On:false” must be intercepted with a switch node.
And last but not least, the “On:true” must be converted to the Volumio command “next”. This is done again with a change-node.
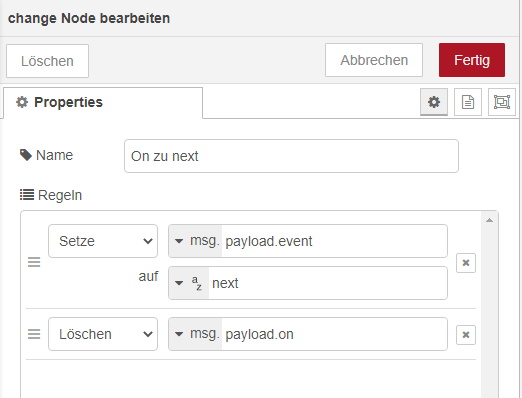
To avoid errors, the “On” is deleted and only the “next” command is passed to Volumio Command. Finally, the connections of the flow should look like this:
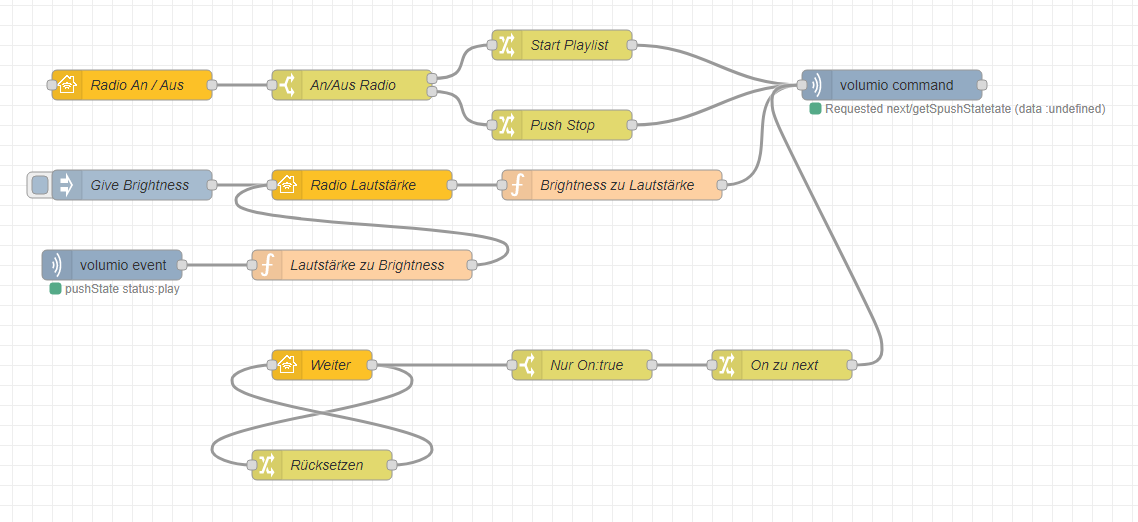
The “Next” switch is now working! This was a hard piece of work but we did it! The Volumio Radio can be controlled from HomeKit. That’s all I wanted for now. This flow runs with me now already longer time and I am satisfied.
I hope it is all understandable that you could understand and build it.
really interesting project. How do you set up the start playlist node – I cannot see it explained anywhere
I have forgotten a picture and a short text paragraph in the english translation. I am sorry! The article is now adjusted and the missing information is now available.